What Is AE/AF Lock? How To Use It?
What is AE/AF lock, first of all?
Auto exposure/auto focus lock (It’s fairly easy to understand AE/AF-L). The camera determines the exposure and focus for a specific point in your composition before locking it in. The exposure and focus are locked and cannot be changed, but you can move your phone around and recompose your shot.
Your smartphone’s camera is a remarkable piece of technology, but it isn’t faultless. Sometimes you have to take charge and direct it. Use of AF/AE-Lock is one of the simplest ways to accomplish this.
For more specific information, keep reading.
Table of Contents
What Is AE/AF Lock?
In essence, you’re telling your camera to lock this particular focus distance and exposure setting and ignore everything else. See my article on auto exposure lock for a more in-depth look at AE/AF-L lock or using it with your DSLR.
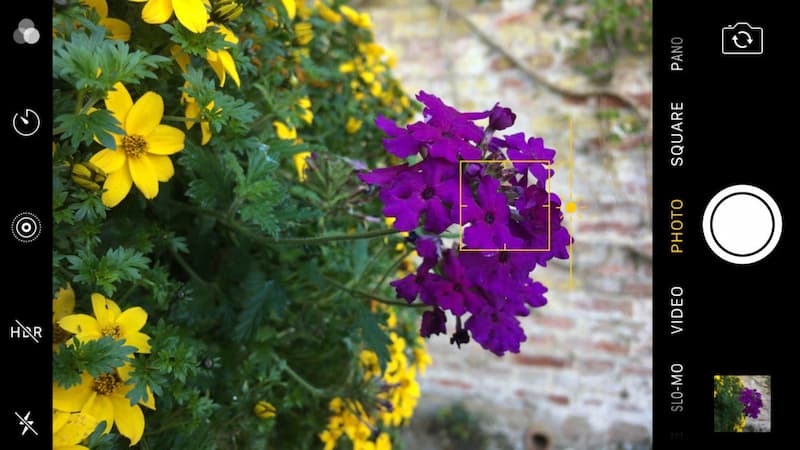
By placing your finger exactly where you want to base your focus and exposure, on the screen, you can activate AE/AF-L. Hold your finger in place until the yellow square, sunburst, and block, which confirm AE/AF-L, appear (see illustration below). By swiping your finger up or down on the screen, you can change the exposure if it’s too light or dark. (Anywhere else on your screen can be tapped to disable AE/AF-L.)
Ways To Use AE/AF Lock To Lock Focus & Exposure
Simply tap and hold on that area of the screen for a few seconds to lock the focus and exposure point. Release your finger when you see AE/AF Lock in a yellow box at the top of the screen.
Focus is fixed on that area of the scene when AE/AF Lock is engaged. Until you tap on another area of the screen, it will stay locked.
Even after you press the shutter button, it remains locked. This is fantastic because it enables you to capture the scene multiple times without having to manually adjust the focus and exposure for each picture.
Similar to how the focus is set by tapping once, the exposure level is also automatically adjusted to properly expose the area that you have focused on. Swiping up or down on the screen will still let you adjust the exposure, though.
Simply tap anywhere on the screen to enable exposure and focus. You will know that focus and exposure are no longer locked when the AE/AF Lock in the yellow box vanishes.
It’s important to remember that once you’ve locked focus, you shouldn’t adjust the distance between your camera and the subject. To put it another way, avoid moving toward or away from your subject.
The camera will end up focusing on the incorrect area of the scene if you move forward or back, for example. in front of or behind the subject.
See the image below, where the background is blurry and the flower in the foreground is in focus.
Watch what happens as the camera is lowered to get a better look at the flower. The camera didn’t refocus onto the foreground flower because AE/AF Lock was engaged. In place of the flower, it was eventually drawn to the foliage.
Don’t move the camera toward or away from the subject after activating AE/AF Lock. If you need to move forward or backward to recompose the shot, tap the screen once to turn off AE/AF Lock, then reset the focus and exposure from your new shooting position. See more about How To Use VSCO?
When Would I Use AE/AF Lock
You should think about AE/AF-L in a number of typical circumstances. Not only would you use it in these situations, but you wouldn’t necessarily use it each time you encountered one of them. So take into account these illustrations to help you get a sense of when you might want to use this feature.
Something In The Scene Is Moving
Your scene’s movement may cause the camera’s focus to attempt to follow. Imagine focusing on a statue in a city park while your camera’s exposure and focus follow a pedestrian across the park, changing as she moves farther away and into a darker area. A moving vehicle or a plant swaying in the wind could be captured by the camera. Any of these might possibly result in a blurry or improperly exposed image. AE/AF-L can help!
Extreme Range Of Exposure
You can have extremely bright highlights and extremely dark shadows, which are typical of the middle of a sunny day. The spectrum of brightness between light and dark tones might be wider than what your camera sensor can capture. The use of HDR in this circumstance is one option. Here, the camera takes two exposures—one for the brights and one for the darks—and combines them. You might be better off using AE/AF-L, though, if neither the brights nor the darks are crucial. Consider taking a picture of your spouse in a sky that is entirely bright and gray, with no clouds or other natural features. You might not give a damn about the sky in the background, but you give a damn about a nice picture of your husband! When using AE/AF-L to get him properly exposed and in focus, focus on his face in the center of the frame.
Selfies taken in front of bright backdrops also frequently exhibit this. Yes, I could have chosen a subject that was more photogenic, but sometimes you just have to make due with what you’ve got. The point is that, depending on the region and brightness you choose to base the exposure on, you can obtain wildly different exposures. The image on the far right shows what the camera was trying to capture. As you can see, compared to the center shot, it makes my face appear a little bit too dark and muddy. Both blow the sky away. I use AE and AF on the statue to get the sky, but that makes me too dark (which might not be a bad thing!) However, you would want your selfie to be fantastic! Decide where to position your AE/AF-L for the best shot, then start shooting! Another option here is HDR.
Depending on where I decide to place the AE and AF, I can get three different selfie exposures.
Depth Of Field
The camera on a smartphone has a tiny but powerful sensor. Because of its small size, it has the ability to produce sharp details with a significant depth of field. From the foreground to the distant background, almost everything can be in sharp focus. However, unless you explicitly tell the camera that it is important, something in the very foreground won’t be in focus.
Imagine shooting frost or raindrops onto a window from directly inside it. Most cameras won’t automatically focus that closely on a transparent object, like a piece of glass. Your frost or water droplets will become hazy as they instead focus farther into the scene. Additionally, because it tends to be brighter outside than inside, your interior is probably not properly lit. AE/AF-L comes to the rescue. To get the ideal shot, you can direct your camera to prioritize the activity on and around the window.
Silhouette
In order to make a silhouette, you should underexpose the subject or object while your camera tries to properly expose it. By positioning your AE/AF-L point in the sky and letting your subject become a silhouette, you can tell your camera to expose for the sky.
Macro
While the camera on your phone can’t really capture macro shots, it can approach objects closer than you might imagine. However, you’ll need to use AE/AF-L to tell the camera what’s important to you in order to get a good bokeh—that creamy, soft background. Try positioning the AE/AF-L near the area where you want your focus to be the sharpest. Once that is configured, you can now move your phone a little bit left or right, closer or farther away, until you see the ideal shot.
Your Phone’s Camera Can’t Seem To Focus
Perhaps an edge doesn’t have enough contrast for your phone’s auto focus system to locate it. That can occur when there is hazy, dim lighting and when objects lack distinct, sharp edges. Or perhaps the camera is having trouble establishing a sufficient distance for auto focus because you are relatively close to the subject. You can try tapping once where you want the focus to be, but occasionally that is insufficient. The issue might be fixed by AE/AF-L.
The Bottom Line
For auto exposure and auto focus, use the AE/AF lock. The brightness of the image is adjusted by auto exposure, and the sharpness of a photograph is altered by auto focus. When you lock the focus, you are directing the exposure and focus to a particular area. By ensuring that your image has the proper exposure, this can improve your mobile photography. Additionally, moving light or activity can cause blurry images when photographing stationary objects. When taking pictures in low light or with strong contrast in the light, this feature is also crucial.
If you have any questions, please DO LEAVE A COMMENT in the blog comment section below, and I will be happy to assist you.