What Is EV (Exposure Value)? An Ultimate Guide
To start with, what is EV?
In photography, the exposure value (EV) is a figure that combines the aperture and shutter speed. It indicates the amount of lighting present in the environment and explains which settings will result in the proper exposure.
In today’s world of digital cameras, some EV principles are no longer relevant. But the exposure triangle must be understood in light of the underlying concept.
Please continue reading for more information.
Table of Contents
What Is EV (Exposure Value)?
Exposure value (EV) can be thought of as the result of combining shutter speed and aperture. EV 0 is 1 s and f/1.0. The exposure is then reduced by half by either stopping down the aperture or speeding up the shutter. EV15 would correspond to 1/1000 s and f/5.6, 1/500 s and f/8, etc. EV is frequently used in camera settings for exposure compensation. The idea does not consider ISO because it was created during the film era. On film, you cannot alter the ISO setting. The camera exposure compensation, though, might also alter ISO.
EV and LV are frequently confused with one another, i.e. light value. The amount of light is described by its light value. With ISO 100, one can expose LV at EV by connecting EV and LV. (EV x+1 would be used for ISO 200, EV x+2 for ISO 400, etc.). For instance, since sunlight has an LV of 15, one would expose it at 1/1000 s and f/5.6 when the ISO is 100.
LV is about the scenery, while EV is solely concerned with camera settings.
A method for estimating the EV
With apertuers
f/1.4 = 1
f/2 = 2
f/2.8 = 3
f/4 = 4
f/5.6 = 5
Select the whole number that best represents the value. The rule is broken after f/5.6. People with programming experience can use just two’s powers with the shutter speed one. f/250 (256) = 8, f/1000 (1024) = 10. The two values should then be added.
The EV Scale
Typically, EV scales between -6 and +17 are what you’ll see. HowEVer, theoretically, there is no restriction in either direction. For instance, using f/22 and a shutter speed of 1/4000 second results in an EV of nearly 21, EVen though (at least at ISO 100) most real-world subjects would be too dark at those settings.
Your shutter speed and aperture (i.e., the “darker” the less light you capture with them), the greater your Hopefully this makes some sense; EV is frequently used to describe both the camera settings you use and the brightness of the scene itself. You are exposing for a brighter subject when the EV is higher.
You’ll need a high EV, such as +15 or +16, for a bright, midday scene. In other words, you don’t want your aperture and shutter speed to let in too much light.
You’ll require a much lower value, such as -5 EV, for a dark subject, like the Northern Lights, in order to prEVent underexposure.
Ways To Use Exposure Value In The Real World
There isn’t much information contained in the EV number alone. In the past, photographers dEVeloped the skill of judging the EV from a scene.
Let’s examine some instances of EV in real-world settings.
EV 16 — Bright sunny day on the beach or in snow
EV 12 — Overcast day or open shade
EV 10 — Just after sunset or before sunrise
EV 8 — Bright Street scene at night
EV 6 — Home interior
EV 4 — Floodlit building
EV 1 — Blue hour
EV -3 — Scene lit by a full moon
EV -6 — Night scene with little moonlight
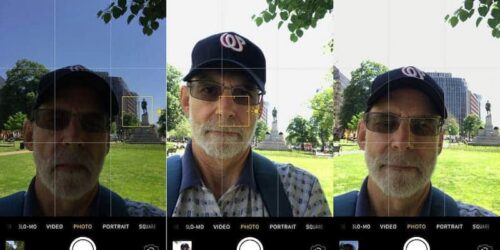
To determine an image’s exposure value, we can use light meters. These meters can use the EV to determine the camera settings that will adequately expose the scene. Here are two images from the Lumu Lightmeter app. The light on the shadowed flowers is being measured on the left by the +7.8EV meter. The indicator for a sunny sky is the number +14.8 on the right. To balance the exposure, you can alter the shutter speed, ISO, and f-stop.
Different Camera Settings Can Give The Same EV
Observe the EV chart once more. Take note of how various shutter and aperture combinations can produce the same EV. A scene can be properly exposed in a variety of ways. Understanding EV might be the key to opening the door if you are having trouble wrapping your head around the exposure triangle.
EV 16, a day with bright sunshine, can be effectively exposed at:
- f/2.8 and 1/8000th of a second;
- f/8.0 at 1/1000th of a second; and
- f/16 at 1/250th of a second.
EV 8, which roughly corresponds to the amount of light at sporting EVents or on a nighttime street with artificial lighting, can be properly exposed at:
- f/2.8 at 1/30th of a second;
- f/8.0 at 1/4 of a second; and
- f/16 and open the shutter for 1 second.
What Influences The Exposure Value Of Iso?
In the original EV calculation, ISO is held constant at 100. HowEVer, the concept can be expanded so that ISO plays a full role in our exposure choices. Your ISO will increase by two stops of light. You can add or subtract a stop of light in the aperture or shutter speed for EVery stop of light that the ISO adds.
EV 16 can be effectively exposed at:
- f/8.0 at 1/1000th of a second at ISO 100;
- f/11 at 1/1000th of a second at ISO 200 (one stop of light); and
- f/8.0 at 1/500th of a second at ISO 200.
EV 8 can be effectively exposed at:
- f/8.0 at 1/4 of a second at ISO 100;
- f/32 at 1/4 of a second at ISO 1600 (four stops of light); and
- f/8.0 at 1/60th of a second at ISO 1600.
Change your ISO from 100 to 200 to add a stop of light, and the settings will change to account for the brighter output. For your convenience, we have updated the EV chart.
Why Lack An EV Setting On Modern Cameras?
Giving a quick and easy number for an image’s exposure using its exposure value is a useful technique. The exposure triangle, which consists of aperture, shutter speed, and ISO, is much more complicated than this.
Therefore, why don’t camera manufacturers include an EV setting on our cameras? Wouldn’t that enable us to control the light in front of us and achieve the ideal exposure? On a sunny day, for instance, we could dial in EV15, and the camera would choose the appropriate aperture, shutter speed, and ISO automatically.
Although this would be easier, your creativity and photographic options would be limited.
Both f/11 at 1/30th of a second, ISO 100, and f/2.8 at 1/250th of a second, ISO 100, will properly expose the scene at EV12 (shaded). But your image would appear very differently. At f/2.8, the depth of field will be shallower and the background will be blurry.
Another acceptable exposure for a night scene is EV 8 at f/1.4 at 1/250th of a second, ISO 200, or f/16 at 1 second, ISO 100. However, at 1 second as opposed to 1/250th of a second, motion blur is much more likely to be captured.
More factors than just exposure play a role in image capture. Your image’s appearance will depend on the camera settings you select. In order to capture the style you want, mastering camera settings is essential.
Exposure Value And Semi-automatic Modes
The EV in a scene is measured by a built-in light meter in modern digital cameras. Within your image’s Exif data, you can locate a light value. The brightness value and exposure value are comparable but not the same. Your camera will change the other setting to maintain a constant EV if you are shooting in Aperture or Shutter Priority mode. This occasionally confounds photographers who anticipate that changing a setting will make their images lighter or darker.
A wider aperture won’t make your image brighter in Aperture Priority mode (also known as A or Av setting). A wider aperture lets in more light, but your camera makes up for it by using a slower shutter speed. The EV does not change.
If you are using the Shutter Priority setting, also referred to as S or TV, it is similar. In order to brighten your image, you cannot open your shutter for a longer period of time. Although you will let in more light, your camera will make up for it by using a smaller aperture. The exposure will therefore be the same for you.
Go to Manual Mode if you want to lighten or darken your image. The shutter speed and aperture values can both be adjusted in this mode. Alternatively, you can make use of the exposure compensation dial found on many cameras. This dial instructs the camera to expose brighter or darker EVen though it detects a particular EV when it meters.
The EV Changed By Neutral Density Filters: How?
The impact of neutral density (ND) filters on EV can be unclear to some photographers. For instance, using a 3-stop ND filter will stop three stops of light from entering your camera. The main purpose of ND filters is to reduce shutter speed and capture blurry motion. Usually, you don’t want to make the image darker. A properly exposed image is still what you want.
Your camera perceives three stops less light in the scene when using a three-stop ND filter. Your camera will now perceive the light as EV 9 if the scene is an overcast day with EV 12 light.
The addition of a 3-stop ND filter changes your settings from f/16 at 1/15th of a second, ISO 100, to f/16 at 1/2 second, ISO 100, from your original f/16 settings. As a result, the shutter speed is three stops slower. However, in both situations, the image is exposed equally.

EV Practical Applications
One thing I always keep in mind when learning a new concept in photography is that it can be useful even when it’s not actually worth using.
I bring this up because it’s clear that most photographers do not consider EV in their day-to-day work anymore, nor is it a concept you need to comprehend in order to take accurate exposures.
Even when using manual mode, the majority of photographers choose their camera settings by examining their histogram or the advice provided by their camera meter. Few photographers actually go through the entire process of analyzing the scene, attempting to determine where it falls on an EV chart, and then determining the appropriate aperture/shutter speed values for that EV. Other than film photographers who forgot their meter (and now their phone) at home, there are better alternatives.
Even so, there are some useful applications for EV, even though the majority of them are somewhat obscure. As an illustration, you may have seen advertisements for cameras that can measure or focus at -4 EV (or -5 EV, -6 EV, etc.) of light.). In that case, understanding EV is crucial to comprehending a camera’s capabilities.
Additionally, it’s an area where a little knowledge can help you save some money. By using wide-aperture lenses for their measurements, manufacturers like to inflate their EV numbers. For instance, a camera that can focus in -6 EV conditions with an f/1.2 lens sounds very impressive—and it is—but a camera that can focus in -5 EV conditions with an f/2 lens actually performs slightly better in low light (something that becomes clear once you equalize the f-stops and shift the EV accordingly).
Another use for it in the field is to simply sharpen your “mental meter” and learn to spot when your camera’s suggested exposure might be off. If your camera’s settings are f/8 at 1/4000 second on a cloudy day, something is wrong. Your ISO was probably unintentionally increased too high.
The last real-world example I’ll give is when you’re using a 10-stop ND filter to take long-exposure photos. You can get a set of potential aperture/shutter speed values to use by moving up a chart like this by 10 EVs, which can be useful if your meter is having trouble reading through the filter (especially as the light changes). See more about What Is AE/AF Lock?
Are Exposure Values Useful?
Due to this, even though the idea of EVs allows for a more comprehensive understanding of the relationship between light (aperture), time (shutter speed), and sensitivity (ISO), it is not very useful when you’re out in the field taking pictures. Nobody wants to use an exposure chart every time they take a photo, especially since the camera will calculate the exposure for you if you use a semi-automatic exposure mode like Aperture priority or Shutter priority.
Since it isn’t a system that is actually useful, very few photographers would EVen be aware that the Exposure Value used in each of the examples above is EV 15. If you just change the setting you want, modern cameras will do all the calculations for you. Knowing which EV numbers result in which combinations is not something you’ll EVer need to know, but it is important to understand how one exposure variable affects another.
The only exception is if you’re using a portable light meter that provides exposure readings in EV, which you must manually translate into combinations of shutter speed and aperture using a dial on the meter.
Why Do You Need To Alter Your Exposure Value Settings?
Despite how expensive they are or how many features they have, digital cameras still make mistakes. Complex scenes may cause your camera sensor to incorrectly interpret the light.
You will likely have a lot of underexposed or overexposed shots if you quickly take pictures without checking and adjusting EV. While tools for image processing like Aurora HDR can be helpful, it is occasionally impossible to recover details in the image’s highlights and shadows.
When photographing scenes with high contrast, you must adhere to certain rules, especially if a tripod is not available. You can photograph a white cat against a white background without it turning gray or invisible by adjusting the camera’s EV setting.
Depending on the effect you want to achieve, you will also need to adjust EV exposure to control the depth sharpness. How can you determine this value and what is the EV scale? Look below for the solutions.
How Is Exposure Value Calculated?
Examine the relationship between shutter speed, f-stops, and exposure values. Check out the table to select the ideal value for you. The dynamic range of your digital camera and the situation at hand limit the adjustments you can typically make.
What are some illustrations of adjusting various exposure values?
Outdoor photography:
- Artificial light from ads at night 9 to 10 EV
- Artificial light from fountains or buildings at night 2 to 5 EV
- Natural light at golden hours 12 EV
- Natural light at night -2 to -11 EV
- Snowy or sandy scenes 16 EV
- Clear sunlight scenes 12 EV
Indoor Photography:
- Artificial light in offices, galleries and gyms 8 to 10 EV
- Interior at home or Christmas tree lights 5 EV
How Should Your Camera’s Settings Be Changed For Hdr Photos?
A photograph with a high dynamic range shows the contrast between the lightest and darkest areas of the scene. On modern camera sensors, bright and dark details cannot be captured in a single exposure.
In order to record as many details as possible, we use bracketing. It entails taking a number of shots at exposure values of one or two stops. You only need to press the shutter button once if your camera has an automatic bracketing mode. It’s crucial to master the bracketing technique for anyone learning about HDR photography.
You can manually set your camera to -2/0/+2EV stops to take one set of underexposed, one set of overexposed, and one set of normal pictures. You can take up to ten shots at one EV stop per shot when shooting complex scenes at night or on a bright, sunny day. To ensure that your shots are lEVel and motion-free in between each EV exposure, a tripod is a useful tool.
HDR allows you to expand the dynamic range of your digital camera and precisely expose different aspects of a photo without having to give up details or artistic quality because it greatly exceeds the EV you can shoot.
What About ISO?
You’ll see that the chart above assumes ISO 100, and I also made passing references to ISO 100 a few other times throughout this article. What makes that ISO so special?
That’s just how the chart is calibrated; it makes the assumption that you are always at ISO 100. However, you can make a chart very much like this for any other ISO. Since the ISO scale goes from 100, 200, 400, and 800, ISO 800, for instance, is three stops brighter than ISO 100. Overexposure is inevitable if you’re using ISO 800 when the chart assumes you’re using ISO 100. In order to make up for this, you would have to move the “real-world situations” up three spaces in the chart.
Having said that, ISO 100 is the industry standard, and you can pretty much count on seeing it in any EV chart you find online or in print.
The End
EVen today, ideas like shutter speed, aperture, ISO, and proper exposure are closely related to EV. You’ll have picked up the other, more pertinent information by association by the time you fully comprehend the ins and outs of exposure values.
The two charts in this article can also serve as a sort of sanity check to make sure your exposures are reasonable, EVen if nothing else. EVen though it is the most straightforward and rigid meter in existence, it will almost always fall within a reasonable range of the ideal exposure.
Last but not least, a big thank you for reading!